光照贴图参数
The Lightmap Parameters Asset is used to store a set of values for the parameters which control Unity’s Global Illumination (GI) features. They allow you to define and save different sets of values for lighting, for use in different situations. Upon creation, they are stored in your Project folder, and can be accessed via the Project window.
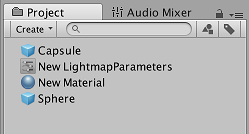
光照贴图参数资源可以用来为不同类型的游戏对象或为不同平台和不同场景类型(例如,室内或室外场景)创建优化的预设。
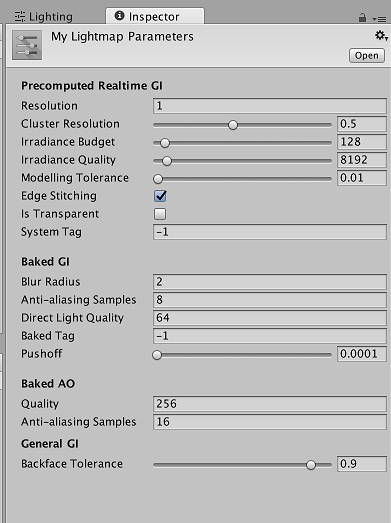
在 Project 窗口中单击某个光照贴图参数资源时,Inspector 窗口将显示该资源中定义的值。下表中列出了参数及其描述。
| 属性 | 功能 |
|---|---|
| 预计算实时全局光照 (Precomputed Realtime GI) | |
| Resolution | 该值在 Lighting 窗口的 Scene 选项卡中缩放 Realtime Resolution 值(菜单:__Window__ > Lighting > Scene__)以提供光照贴图的最终分辨率(纹理像素/距离单位)。 | | Cluster Resolution| 聚类分辨率(内部计算光反射的分辨率)与最终光照贴图分辨率的比率。请参阅有关 Scene 视图中的 GI 可视化的文档以了解更多信息。 | | Irradiance Budget| 此值确定用于照射光照贴图中每个纹理像素的入射光数据的精度。从纹理像素的位置对场景的“视图”采样来获得每个纹理像素的光照。较低的辐照度预算值会导致样本更模糊。值越高,样本的清晰度越高。较高的辐照度预算会改善光照,但这会增大运行时内存使用量并可能增大 CPU 使用率。 | | Irradiance Quality| 使用滑动条来定义投射的射线数量,并计算影响给定输出光照贴图纹理像素的集合。较高的值可在光照贴图中实现视觉改善,但会增加 Unity Editor 中的预计算时间。该值不会影响运行时性能。 | | Backface Tolerance| 网格的结构有时会导致某些纹理像素含有背面带有几何体的“视图”。来自背面的入射光在任何场景中都无意义。因此,此属性用于选择有多少光量(百分比阈值)来自正面几何体才能将纹理像素视为有效。无效纹理像素的光照值通过相邻纹理像素的值估算得出。降低此值可以解决由背面入射光引起的光照问题。 | | Modelling Tolerance| 此值控制网格几何体中允许光线通过的间隙的最小大小。降低此值可允许光线穿过环境中更小的间隙。 | | Edge Stitching| 如果启用此属性,则表示光照贴图中的 UV 图表应无缝连接在一起,从而避免不必要的视觉瑕疵。 | | Is Transparent| 如果启用此属性,在全局光照计算期间,对象显示将为透明。背面对这些计算没有影响,光线将穿过表面。这可用于不可见的发光表面。 | | System Tag| 光照贴图纹理组合在同一个光照贴图图集内的一组对象称为“系统”。如果无法将所有对象放入单个图集中,Unity Editor 会自动定义其他系统及其附带的图集。但是,有时自己定义单独的系统会非常有用(例如,确保不同房间内的对象分组到每个房间的一个系统中)。更改 System Tag__ 号可强制创建新的系统和光照贴图。标签的确切数字序列值不重要。 |
| 烘焙 GI (Baked GI) | |
| Blur Radius | 后期处理过程中应用于直接光照的模糊过滤器的半径(单位:纹理像素)。此半径基本上是相邻纹理像素的平均距离。半径越大,效果越模糊。较高的模糊度往往会减少视觉瑕疵,但也会软化阴影的边缘。 |
| Antialiasing Samples | The degree of anti-aliasing (the reduction of “blocky” artifacts) that is applied. Higher numbers increase quality and bake time. |
| Direct Light Quality | 用于评估直接光照的光线数量。较高数量的光线往往会产生更准确的柔和阴影,但会增加烘焙时间。 |
| Baked Tag | Similar to the System Tag property above, this number lets you group specific sets of objects together in separate baked lightmaps. As with the System Tag, the exact numeric value is not significant. Objects with different Baked Tag values are never put in the same atlas; however, there is no guarantee that objects with the same tag end up in the same atlas, because those objects might not necessarily fit into one lightmap (see image A, below, for an example of this). You don’t have to set this when using the multi-scene bake API, because grouping is done automatically (use the Baked Tag to replicate some of the behavior of the Lock Atlas option). |
| Pushoff | 开始在建模单元中跟踪射线之前从表面几何体推离的距离。此属性适用于所有烘焙光照贴图,因此会影响直射光、间接光和 AO。Pushoff 可用于摆脱不必要的 AO 或阴影。使用此设置可解决对象表面自身阴影遮挡问题,该问题会导致斑点阴影图案出现在表面上而找不到明显来源。也可以使用此设置去除巨型对象上不必要的瑕疵(这种情况下的浮点精度不够高,无法准确地对精细细节进行射线追踪)。 |
| Baked AO | |
| Quality | 评估环境光遮挡 (AO) 时投射的射线数量。射线数量越多,AO 质量越高,但烘焙时间也越长。 |
| Antialiasing Samples | 进行 AO 抗锯齿时要采集的样本数。样本数量越多,AO 质量越高,但烘焙时间也越长。 |
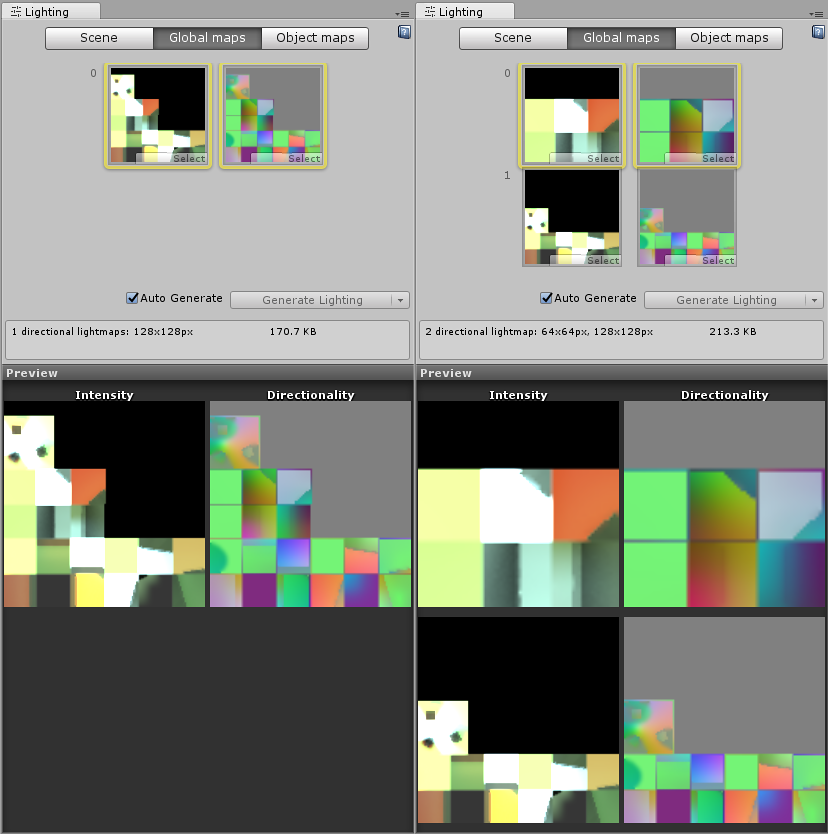
Image A shows two views of the same Scene:
Left: Everything is in one atlas because all the objects have the same Baked Tag.
Right: One object is forced into a second lightmap by assigning a different Baked Tag.
分配光照贴图参数资源
场景
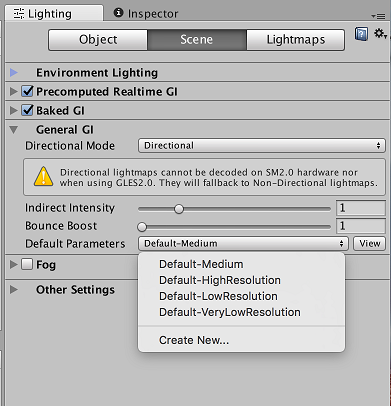
To assign a Lightmap Parameters Asset to the whole Scene, go to Window > Lighting to open the Lighting window. Here, click the Scene tab and navigate to the General GI settings.
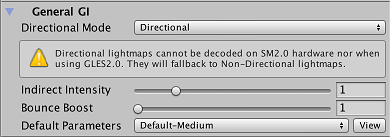
使用 Default Parameters 下拉选单来分配默认的光照贴图参数资源。此下拉选单会列出所有可用的光照贴图参数资源。
游戏对象
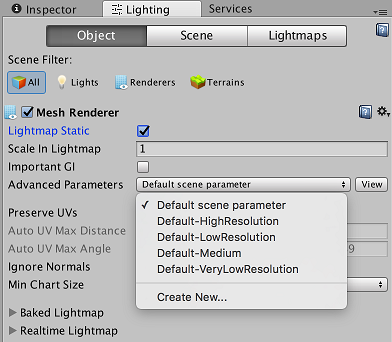
To assign a Lightmap Parameters Asset to a single GameObject, ensure the GameObject has a Mesh Renderer or Terrain component attached. Select the GameObject then open the Lighting window (menu: Window > Lighting) and select the Object tab.
To assign a Lightmap Parameters Asset to a Mesh Renderer, tick the Lightmap Static checkbox and select an option from Advanced Parameters. Choose Default scene parameter if you want to use the same Lightmap Parameters Asset that is assigned to the whole Scene.
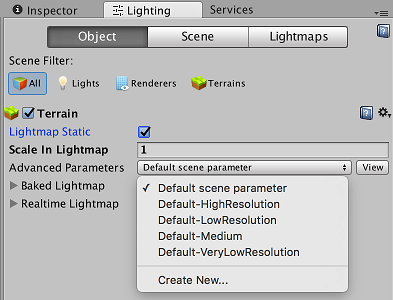
To assign a Lightmap Parameters Asset to a Terrain, tick the Lightmap Static checkbox and select an option from Advanced Parameters. Choose Default scene parameter if you want to use the same Lightmap Parameters Asset that is assigned to the whole Scene.
Creating and adjusting a Lightmap Parameter Asset
To create a new Lightmap Parameters Asset, click Create New… from the list of available Lightmap Parameters Assets. When you do this, the Lighting window changes to display a list of properties for you to create a custom Lightmap Parameters Asset. This window has the same properties as the ones you see in the Inspector window when you select the Lightmap Parameters Asset in the Project window.