Cache Server
Unity 有一个完全自动的资源管线。每当修改 .psd 或 .fbx 文件等源资源时,Unity 都会检测到更改并自动将其重新导入。随后,Unity 以内部格式存储从文件导入的数据。
这种安排旨在使工作流程对于个人用户而言尽可能高效和灵活。但是,在团队中工作时,可能会发现其他用户可能会继续对资源进行更改,所有这些更改都必须导入。此外,在桌面和移动构建目标平台之间切换时,必须重新导入资源。因此,该切换对于大型项目而言可能需要很长时间。
在__缓存服务器__上缓存导入的资源数据可以大大减少导入资源所需的时间。
Unity caches each Asset import based on:
- 资源文件本身
- The Import settings
- The Asset importer version
- 当前平台
If any of the above change, Unity re-imports the Asset. Otherwise, Unity downloads it from the Cache Server.
When you use a Cache Server, you can even share Asset imports across multiple projects (that is, the work of importing is done on one computer and the results are shared with others).
Note: Once the Cache Server is set up and enabled, this process is completely automatic, so there are no additional workflow requirements. It reduces the time it takes to import projects without further intervention from the user.
Enabling a Cache Server
To enable a Cache Server:
- Open the Unity Preferences window (from the main menu: Unity > Preferences on MacOS or Edit > Preferences on Windows and Linux).
- Select Cache Server from the category list on the left. The Cache Server settings appear in the details pane on the right.
- Choose Remote or Local from the Cache Server Mode drop-down box. The properties unique to the selected mode appear.
- Set the Cache Server preferences for the mode you selected.
Tip: It is better to host the Cache Server on a separate computer if possible because of hard drive size limitations.
Note: If you have a local Cache Server with a custom location, and that location becomes unavailable, Unity displays the following warning:
Local cache directory does not exist - please check that you can access the cache folder and are able to write to it
Setting up a Cache Server as an administrator
Administrators need to set up the Cache Server computer that hosts the cached Assets.
To set up the Cache Server on a remote server:
- Download the Cache Server:
- Open Unity’s Download Archive page.
- Locate the Unity version you are using and click the Downloads button for your target server’s operating system.
- Click the Cache Server link to start the download.
- Unzip the file, which looks like this:

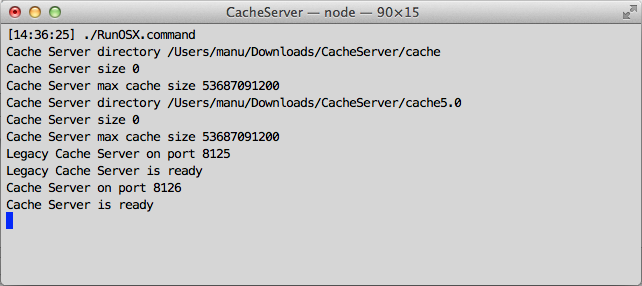
- Run the command script that matches your operating system.
A terminal window appears, indicating that the Cache Server is running in the background:
Important: The Cache Server needs to be on a reliable computer with very large storage (much larger than the size of the project itself, as there will be multiple versions of imported resources stored). If the hard disk becomes full the Cache Server could perform slowly.
将缓存服务器安装为服务
必须将提供的 .sh 和 .cmd 脚本设置为服务器上的服务。
缓存服务器可以随时安全地终止和重新启动,因为它使用原子文件操作。
新版和旧版缓存服务器
默认情况下启动两个缓存服务器进程。旧版缓存服务器适用于 5.0 之前的 Unity 版本。新版缓存服务器适用于 5.0 和之后的 Unity 版本。有关配置、启用和禁用两个不同缓存服务器的详细信息,请参阅下面的缓存服务器配置。
缓存服务器配置
如果通过执行脚本直接启动,将在端口 8125 上启动旧版缓存服务器,而在端口 8126 上启动新版缓存服务器。此外还会在与脚本相同的目录中创建“cache”和“cache5.0”目录,并在其中保存数据。默认情况下,缓存目录最多可增长到 50 GB。可以使用命令行选项配置数据的大小和位置,如下所示:
./RunOSX.command --path ~/mycachePath --size 2000000000
或者
./RunOSX.command --path ~/mycachePath --port 8199 --nolegacy
可以使用以下命令行选项配置缓存服务器:
- 使用
--port指定服务器端口。这仅适用于新版缓存服务器。默认值为8126。 - 使用
--path指定缓存位置的路径。这仅适用于新版缓存服务器。默认值为./cache5.0。 - 使用
--legacypath指定缓存位置的路径。这仅适用于旧版缓存服务器。默认值为./cache。 - 使用
--size指定两个缓存服务器的最大缓存大小(以字节为单位)。超过此缓存大小时,将自动丢弃最近未使用的文件。 - 使用
--nolegacy禁止启动旧版缓存服务器。否则,旧版缓存服务器会在端口8125上启动。
托管缓存服务器的计算机的要求
为获得最佳性能,必须有足够的 RAM 来容纳整个导入的项目文件夹。此外,计算机最好配备快速硬盘驱动器和快速以太网连接。硬盘驱动器还应该有足够的可用空间。另一方面,缓存服务器的 CPU 使用率非常低。
缓存服务器和版本控制系统之间的主要区别之一是其缓存的数据始终可以在本地重建。它只是一种提高性能的工具。因此,在互联网上使用缓存服务器是没有意义的。如果是分布式团队,应在每个位置放置单独的缓存服务器。
缓存服务器在 Linux 或 Mac OS X 计算机上的运行效果最好。Windows 文件系统没有针对缓存服务器的数据存储方式进行很好的特别优化,并且 Windows 上的文件锁定问题可能会导致一些在 Linux 或 Mac OS X 上不会出现的问题。
关于缓存服务器的常见问题解答
随着导入和存储的资源越来越多,缓存服务器数据库的大小会无限增长吗?
缓存服务器会自动删除一段时间未使用的资源(当然,如果再次需要这些资源,则会在下次使用时重新创建这些资源)。
缓存服务器是否仅适用于资源服务器 (Asset Server)?
根据设计,缓存服务器对源代码/版本控制系统而言是透明的,因此不局限于使用 Unity 的资源服务器。
哪些更改会导致重新生成导入的文件?
当 Unity 即将导入资源时,它会生成所有源数据的 MD5 哈希值。
对于纹理,这包括:
- 源资源:“myTexture.psd”文件
- 元文件:“myTexture.psd.meta”(存储所有导入器设置)
- 纹理导入器的内部版本号
- 所有 AssetPostprocessor 的版本号哈希值
如果该哈希值与缓存服务器上存储的哈希值不同,则重新导入资源。否则,将下载缓存版本。客户端 Unity Editor 仅在需要时从服务器中拉取资源 - 资源在更改时不会被推送到每个项目。
如何使用资源依赖项?
缓存服务器不处理依赖项。Unity 的资源管线不处理依赖项的概念。根据设计,它会避免资源之间的依赖关系。AssetPostprocessor 类是一种用于自定义资源导入器来满足需求的常用技术。例如,有时可能希望将网格碰撞体添加到 .fbx 文件中的某些游戏对象(基于名称或标签)。
使用 AssetPostprocessor 来引入依赖项也很容易。例如,可以使用资源旁边的文本文件中的数据向导入的游戏对象添加其他组件。缓存服务器不支持此功能。如果要使用缓存服务器,必须去除对项目文件夹中其他资源的依赖。由于缓存服务器对后处理器中的依赖项一无所知,因此它不知道是否任何内容已发生更改,因此会使用资源的旧缓存版本。
在实践中,可以通过多种方式进行资源后期处理,以便与缓存服务器配合使用。可以使用:
- 已导入资源的路径
- 资源的任何导入设置
- 源资源本身或在其基础上生成的任何数据(在资源后处理器中传递给您)。
使用材质时是否有任何问题?
Modifying Materials that already exist might cause problems. When using the Cache Server, Unity validates that the references to Materials are maintained, but because no postprocessing calls are invoked, the contents of the Material cannot be changed when a model is imported through the Cache Server. Because of this, you might get different results when importing with and without the Cache Server.
Don’t modify materials that already exist on disk from an Asset postprocessor because if you download an fbx file through the cache server, then there is no import process running for it. So if you rely on resetting the generated materials to some generated defaults every time the model importer runs, then this Asset postprocessor will not be run when importing a cached fbx file.
是否有任何资源类型不会被服务器缓存?
There are a few kinds of Asset data which the server doesn’t cache. There isn’t really anything to be gained by caching script files, so the server ignores them. Also, native files used by 3D modeling software (Autodesk® Maya®, Autodesk® 3ds Max®, etc) are converted to FBX using the application itself. The Asset server does not cache the native file nor the intermediate FBX file generated in the import process. However, it is possible to benefit from the server, by exporting files as FBX from the modeling software and then adding those to the Unity project.
- 2018–11–09 Page amended with limited editorial review