Using an Oblique Frustum
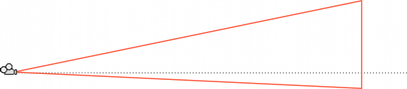
By default, the view frustum is arranged symmetrically around the camera’s center line, but it doesn’t necessarily need to be. You can make the frustum “oblique”, which means that one side is at a smaller angle to the centre line than the opposite side. This makes the perspective on one side of the image seem more condensed, giving the impression that the viewer is very close to the object visible at that edge. An example of how this can be used is a car racing game; if the frustum is flattened at its bottom edge, it appears to the viewer that they are closer to the road, accentuating the feeling of speed.
Although the Camera component does not have functions specifically for setting the obliqueness of the frustum, you can do it by either enabling the camera’s Physical Camera properties and applying a Lens Shift, or by adding a script to alter the camera’s projection matrix.
Setting Frustum Obliqueness with a Lens Shift
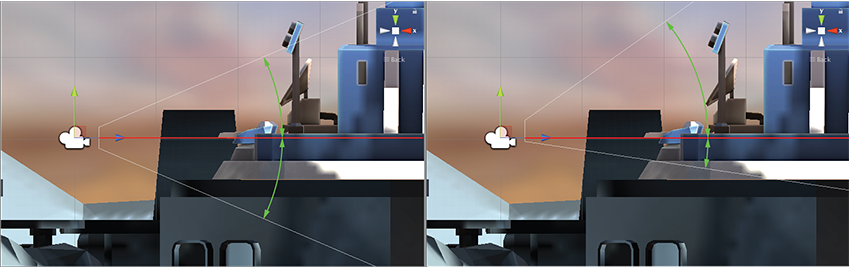
Enable a camera’s Physical Camera properties to expose the Lens Shift options. You can use these to offset the camera’s focal center along the X and Y axes in a way that minimizes distortion of the rendered image.
Shifting the lens reduces the frustum angle on the side opposite the direction of the shift. For example, as you shift the lens up, the angle between the bottom of the frustum and the camera’s center line gets smaller.
For further information about the Physical Camera options, see documentation on Physical Cameras.
For further information about setting individual Physical Camera properties, see the Camera Component reference.
Setting Frustum Obliqueness Using a Script
The following script example shows how to quickly achieve an oblique frustum by altering the camera’s projection matrix. Note that you can only see the effect of the script while the game is running Play mode.
using UnityEngine;
using System.Collections;

public class ExampleScript : MonoBehaviour {
    void SetObliqueness(float horizObl, float vertObl) {
        Matrix4x4 mat  = Camera.main.projectionMatrix;
        mat[0, 2] = horizObl;
        mat[1, 2] = vertObl;
        Camera.main.projectionMatrix = mat;
    }
}
C# 脚本示例
function SetObliqueness(horizObl: float, vertObl: float) {
    var mat: Matrix4x4 = camera.projectionMatrix;
    mat[0, 2] = horizObl;
    mat[1, 2] = vertObl;
    camera.projectionMatrix = mat;
}
JS 脚本示例
幸运的是,没有必要了解投影矩阵如何使用它。horizObl 和 vertObl 值分别设置水平和垂直倾斜量。值为零表示无倾斜。正值使视锥体向右或向上移动,从而使左边或底边变平。负值使视锥体向左或向下移动,从而使视锥体的右边或顶边变平。如果将此脚本添加到摄像机并在游戏运行时将游戏切换到 Scene 视图,则可以直接看到效果;在检视面板中改变 horizObl 和 vertObl 的值时,摄像机视锥体的线框会发生变化。任一变量中的值为 1 或 –1 表示视锥体的一侧与中心线完全齐平。此范围之外的值也是允许使用的,但通常没有必要。
2018–10–05 Page amended with limited editorial review
Lens Shift options added in Unity 2018.2