Model tab

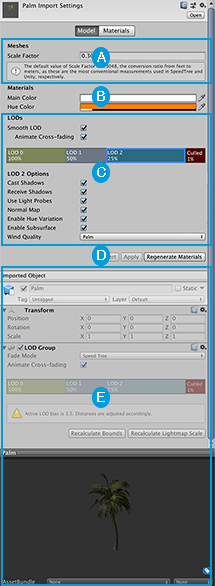
The Model tab of the SpeedTree Import Settings window contains these sections:
 The Meshes section allows you to set the Scale Factor value to apply a global scale on the imported SpeedTree Model. By default, Unity sets this value to 0.3048 (the conversion ratio for feet to meters) because SpeedTree Models generally use 1 foot per unit, and Unity uses 1 meter per unit.
 The Materials section allows you to set the Main Color value, which modulates the diffuse lighting component, and the Hue Color, which Unity uses when the Hue Variation effect is enabled. If your SpeedTree Model contains Billboard Assets, the Alpha Cutoff property also appears. Unity uses the alpha cutoff (or reference value) to compute the values it needs to preserve alpha MIP map coverage on Textures.
 The LODs section contains a specialized variation of the LOD Group component for importing SpeedTree Models. You can set smooth transitions between LOD levels, adjust thresholds for each LOD level, and use the LOD Options to turn off resource-heavy effects on each LOD level.
 The Revert and Apply buttons always appear, but you can only select them after you make changes to the settings on the Model tab. If you change settings on both the Material mapping and the Model tab, the Apply & Generate Materials button appears. If you only change settings on the Material mapping, the Regenerate Materials button appears.
 The properties for the GameObject (read-only) appear at the bottom of the Inspector view, including a preview of the SpeedTree Model with its Material applied.
LODs and their options
Note: This section assumes you have already read the documentation on the LOD Group component. Please read it if you haven’t already; especially the section on Working with SpeedTree Models. It explains key concepts and workflow information that are crucial for understanding how to import SpeedTree Models.
The LODs and LOD Options sections manage level of details (LOD) for importing Model files created in SpeedTree. When the importer detects a SpeedTree Asset, it automatically sets the LOD Fade Mode to Speed Tree.
The LOD Group component for the SpeedTree Model Importer is different from the generic LOD Group component that appears on a SpeedTree instance in Unity:
- The Fade Mode drop-down menu is not available, because the Fade Mode is already set to Speed Tree.
- The playhead for the preview is missing, because you cannot preview the LOD transitions in the Scene view before importing.
- There are four options which control whether and how cross-fading happens: Smooth LOD, Animate Cross-fading, Crossfade Width, and Fade Out Width. Only Smooth LOD is always available.
- Each LOD level has its own set of options that allow you to enable or disable resource-heavy effects, such as shadow casting or receiving, and wind quality.

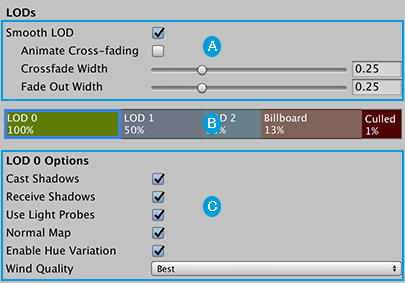
The LODs group, the LOD Group selection bar, and the LOD Options group are tightly integrated and inter-dependent:
 To set smooth transitions between LOD levels, enable the Smooth LOD option. When you enable Smooth LOD, another setting appears underneath it, called Animate Cross-fading. For more information about this property, see Customizing the transition zone. This is enabled by default.

If you disable Animate Cross-fading, two more settings appear: Crossfade Width and Fade Out Width. For more information on what these settings do, see Setting smooth transitions.

These are global settings for the entire GameObject, meaning they don’t change as you move between different LOD levels.
 Use the LOD Group selection bar to select a specific LOD level and access its LOD Options. You can also adjust the LOD level boundaries; to do this, drag the left border of a LOD level box’s boundary.
 Use the LOD Options section to enable or disable level-specific effects to optimize performance.
Setting smooth transitions
Smooth transitions require a blend between levels, so that as the current LOD fades out, the next LOD fades in.
You don’t need to set up blending between two Mesh LOD levels, because SpeedTree Models always use the Speed Tree mode. However, even SpeedTree Models use cross-fading for the last Mesh LOD level (with the lowest resolution) and the Billboard level. For these levels, you can choose to animate cross-fading by time or position.
To use smooth transitions, follow these instructions:
- Enable the Smooth LOD option. The Animate Cross-fading option appears below it, enabled by default.
- If you want to animate the cross-fading by time, enable the Animate Cross-fading option. If you want to specify a position-based transition zone, disable the Animate Cross-fading option and define the following:
- Set the Crossfade Width property to specify what proportion of the last LOD level to use as the transition zone. For example, if you want to delay the cross-fading until halfway through the level, set this property to 0.5.
- Set how long it takes the final level to fade out by setting a proportion with the Fade Out Width property.
- If you want to optimize performance, use the LOD Group selection bar to disable selected features on each LOD level.
Using the LOD Group selection bar
The LOD Group selection bar represents the different LOD levels as colored boxes. When a level box is selected, a blue outline appears around it:

The percentage that appears in each LOD level box represents the threshold at which that level becomes active, based on the ratio of the GameObject’s screen space height to the total screen height.
To select a level, click on the level box. To change the percentage value for a level, drag the boundary to the left of the level container. You can also customize which LOD Options are enabled or disabled on each level, as an optimization strategy.
LOD Options
For each LOD level defined on your SpeedTree Asset (tree), you can customize a variety of properties.
Many of these settings come with an increased performance overhead. To improve performance, you can enable the more costly effects only on the Trees that are nearest to the Camera, and disable them on some of the less detailed LOD levels. For example, if your Tree has three LOD levels, you could enable shadow casting and receiving, subsurface scattering, normal mapping, and wind quality on the first two LOD levels, but disable it on the third. This way, the costly effects are disabled where the Models are far enough away from the Camera that the absence of this effect is not noticeable.
To set LOD Options on a specific LOD level, click the LOD level box on the LOD Group selection bar. The following options appear for that LOD level: