- Unity 用户指南 (2019.1)
- 在 Unity 中操作
- Packages
- Packages window
Packages window
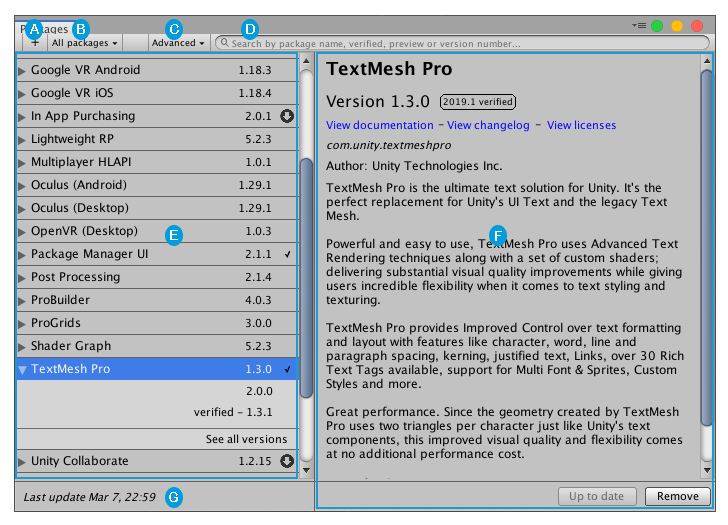
Use the Unity Package Manager (in Unity’s top menu: Window > Package Manager) to view which packages are available for installation or already installed in your Project. In addition, you can use this window to see which versions are available, and install, remove, disable, or update packages for each Project.

The Packages window displays:
 The Add package from disk button, which allows you to specify the location of an external package.
 The package scope drop-down menu, which allows you to filter which packages appear in the list.
 The Advanced button, which allows you to display preview packages in addition to those that have been verified to work with Unity.
 The search box, which allows you to look for packages by name.
 The packages list view, which displays all packages that match the filter and search parameters you specify.
 The package-specific detail view, which displays information specific to the package selected in the list.
 The status bar, which displays messages about the package load status and warnings about the network.
Advanced button
The Advanced drop-down menu allows you to perform these actions:
| Drop-down menu item | Action results |
|---|---|
| Reset Packages to defaults | Select this item to return to Unity Package Manager default settings. WARNING: This removes all customization from your Project manifest file. Only use this a last resort when you can’t figure out what is wrong with your Project manifest file. |
| Show dependencies | Display each package’s dependencies in the details view. |
| Show preview packages | Include preview packages in the package list. NOTE: Preview packages are not verified to work with Unity and might be unstable. They are not supported in production environments. |
- 2019–04–11 Page published with editorial review