Progressive CPU Lightmapper
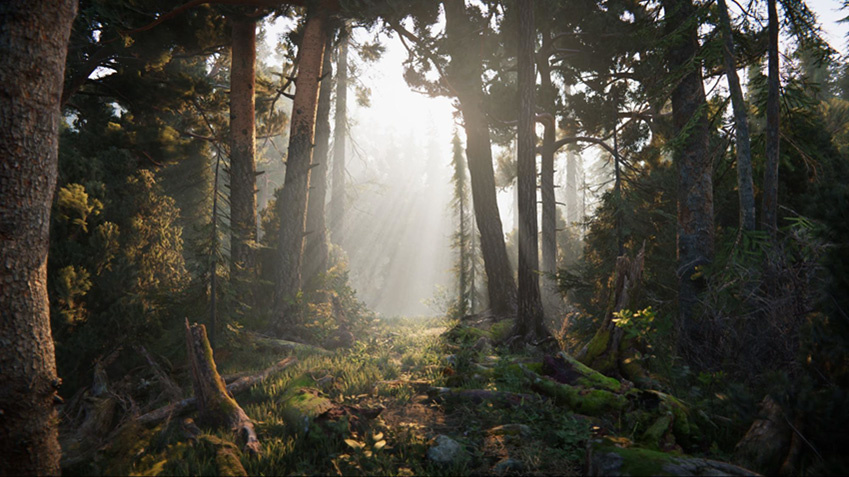
渐进式光照贴图是一种基于路径追踪的光照贴图系统,提供了能在Edtior中逐渐刷新的烘焙光照贴图和光照探针。要求不重叠的 UV 具有较小的面积和角度误差,以及棋盘格图表(charts)之间有足够的填充。
渐进式光照贴图采取了一个短暂的准备步骤来处理几何体与实例的更新,同时生成 G-buffer 和图表遮罩(chart masks)。然后,它会立即生成输出,并随着时间的推移逐步细化输出,以实现更完善的交互式照明工作流。此外,烘焙时间更加可预测,因为渐进光照贴图在烘焙时提供估计时间。
渐进光照贴图还可单独为每个纹理像素分别以光照贴图分辨率烘焙全局光照 (GI),无需采用上采样方案或依赖任何辐照度缓存或其他全局数据结构。因此,渐进光照贴图具有强大的功能,并允许您烘焙光照贴图的选定部分,从而更快测试和迭代场景。
如需观看介绍交互式工作流程的深入视频,请参阅 Unity 的视频演练:开发中 - 渐进光照贴图 (In Development - Progressive Lightmapper) (YouTube)。
设置
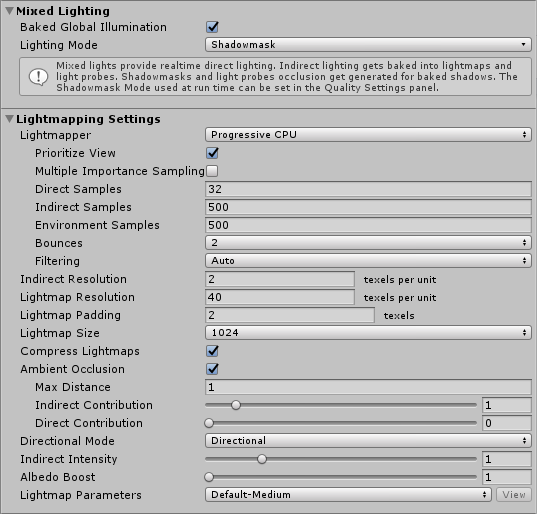
To open the settings, go to Window > Rendering >Lighting Settings.
| Property: | Function: | ||||
|---|---|---|---|---|---|
| Lighting Mode | Specifies which lighting mode Unity should use for all mixed lights in the Scene. Options are Baked Indirect, Distance Shadowmask, Shadowmask, and Subtractive. | ||||
| Lightmapper | Use this to specify which internal lighting calculation software to use to calculate lightmaps in the Scene. The options are Progressive and Enlighten. The default value is Progressive. If you want to use the Enlighten system, see documentation on Enlighten. | ||||
| Prioritize View | Enable this to make the Progressive Lightmapper apply changes to the texels that are currently visible in the Scene View, then apply changes to the out-of-view texels. | ||||
| Direct Samples | The number of samples (paths) shot from each texel. This setting controls the number of samples Progressive Lightmapper uses for direct lighting calculations. Increasing this value can improve the quality of lightmaps, but increases the baking time. | ||||
| Indirect Samples | The number of samples (paths) shot from each texel. This setting controls the number of samples Progressive Lightmapper uses for indirect lighting calculations. For some Scenes, especially outdoor Scenes, 100 samples should be enough. For indoor Scenes with emissive geometry, increase the value until you see the result you want. | ||||
| Bounces | Use this value to specify the number of indirect bounces to do when tracing paths. For most Scenes, two bounces is enough. For some indoor Scenes, more bounces might be necessary. | ||||
| Filtering | Configure the way the Progressive Lightmapper applies post-processing to lightmaps to limit noise. For lightmap post-processing, the lightmap is split into Direct, Indirect and Ambient Occlusion targets that Unity applies post-processing to individually, before it composites them together into a single lightmap. - Direct: Any light that arrives directly from a Light to a sensor (usually the Camera). - Indirect: Any light that arrives indirectly from a Light to a sensor. This most commonly applies to light that reflects off other GameObjects. - Ambient Occlusion: Any ambient light that the lighting system calculates. See Ambient Occlusion for more information. The Progressive Lightmapper supports the NVIDIA OptiX AI-Accelerated Denoiser, which reduces perceptible noise in the lightmap without causing blurring. It requires an NVIDIA GPU with 4GB+ VRAM and driver version 390+. It is not supported for the NVIDIA Series 20x GPUs (Turing RTX). It is only supported on the Windows platform. |
||||
| None | Select this to use no filter or denoising for the lightmap. | ||||
| Auto | Select this to use a platform-dependent preset for post-processing the lightmap. If your development machine fulfils the requirements to run OptiX (the NVIDIA OptiX AI-Accelerated Denoiser), the Progressive Lightmapper uses the denoiser with a Gaussian filter that has a 1-texel radius for all targets. If your development machine cannot run OptiX, the Progressive Lightmapper uses a Gaussian filter that has a 1-texel radius for Direct, 5-texel radius for Indirect, and 2-texel radius for Ambient Occlusion. |
||||
| Advanced | Select Advanced to manually configure options for each type of lightmap target. The targets types are Direct, Indirect and Ambient Occlusion. For more information, see Advanced Filtering settings, below. | ||||
| Lightmap Resolution | Use this to specify the number of texels per unit to use for lightmaps. Increasing this value improves lightmap quality, but also increases bake times. Note that doubling this value causes the number of texels to quadruple (because the value refers to both the height and width of the lightmap). Check the Occupied texels count in the stats, documented below this table. | ||||
| Lightmap Padding | Use this to specify the separation (in texel units) between separate shapes in the baked lightmap. The default value is 2. | ||||
| Lightmap Size | The size (in pixels) of the full lightmap texture, which incorporates separate regions for the individual GameObject textures. The default value is 1024. | ||||
| Compress Lightmaps | A compressed lightmap requires less storage space, but the compression process can introduce unwanted visual effects into the texture. Tick this checkbox to compress lightmaps, or untick it to keep them uncompressed. The checkbox is ticked by default. | ||||
| Ambient Occlusion | Tick this checkbox to open a group of settings which allow you to control the relative brightness of surfaces in ambient occlusion. Higher values indicate a greater contrast between the occluded and fully lit areas. This only applies to the indirect lighting calculated by the GI system. This setting is enabled by default. | ||||
| Max Distance | Set a value to control how far the lighting system casts rays in order to determine whether or not to apply occlusion to an object. A larger value produces longer rays and contributes more shadows to the lightmap, while a smaller value produces shorter rays that contribute shadows only when objects are very close to one another. A value of 0 casts an infinitely long ray that has no maximum distance. The default value is 1. | ||||
| Indirect Contribution | Use the slider to scale the brightness of indirect light as seen in the final lightmap (that is, ambient light, or light bounced and emitted from objects) from a value between 0 and 10. The default value is 1. Values less than 1 reduce the intensity, while values greater than 1 increase it. | ||||
| Direct Contribution | Use the slider to scale the brightness of direct light from a value between 0 and 10. The default value is 0. The higher this value is, the greater the contrast applied to the direct lighting. | ||||
| Directional Mode | You can set the lightmap up to store information about the dominant incoming light at each point on the objects’ surfaces. See documentation on Directional Lightmapping for further details. The default mode is Directional. | ||||
| Directional | In Directional mode, Unity generates a second lightmap to store the dominant direction of incoming light. This allows diffuse normal mapped materials to work with the GI. Directional mode requires about twice as much storage space for the additional lightmap data. Directional lightmaps cannot be decoded on SM2.0 hardware or when using GLES2.0. They fall back to Non-Directional lightmaps. | ||||
| Non-directional | Non-directional mode switches Directional option off. | ||||
| Indirect Intensity | Use this slider to control the brightness of indirect light stored in realtime and baked lightmaps, from a value between 0 and 5. A value above 1 increases the intensity of indirect light while a value of less that 1 reduces indirect light intensity. The default value is 1. | ||||
| Albedo Boost | Use this slider to control the amount of light Unity bounces between surfaces, from a value between 1 and 10. To do this, Unity intensifies the albedo of materials in the Scene. Increasing this draws the albedo value towards white for indirect light computation. The default value of 1 is physically accurate. | ||||
| Lightmap Parameters | Unity uses a set of general parameters for the lightmapping in addition to properties of the Lighting window. A few defaults are available from the menu for this property but you can also create your own lightmap parameter file using the Create New option. See the Lightmap Parameters page for further details. The default value is Default-Medium. | ||||
Advanced Filtering settings
| Setting | 描述 | |
|---|---|---|
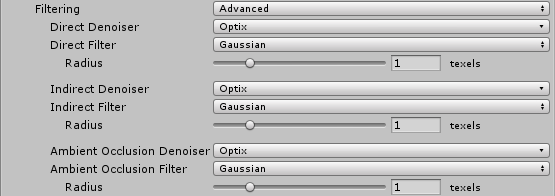
| Advanced | Set Filtering to Advanced to manually configure options for each type of lightmap target. The target types are: - Direct: Any light that arrives directly from a Light to a sensor (usually the Camera). - Indirect: Any light that arrives indirectly from a Light to a sensor. This most commonly applies to light that reflects off other GameObjects. - Ambient Occlusion: Any ambient light that the lighting system calculates. See Ambient Occlusion for more information. |
|
| Denoiser | Select a denoiser to use for the lightmap target: - Optix: If your development machine fulfils the requirements to support the NVIDIA OptiX AI-Accelerated Denoiser, you can select it here. If your system cannot run it, this option is greyed out and set to None by default. - None: Select this to use no denoising for the lightmap target. |
|
| Filter | Select a filter to use for the lightmap target: - Gaussian: Select this to use a Gaussian filter for the lightmap target. The Gaussian filter applies a bilateral Gaussian filter on the lightmap. This blurs the lightmap and reduces the visible noise. - A-Trous: Select this to use an A-Trous filter for the lightmap target. The A-Trous filter minimizes the amount of blur while it removes visible noise in the lightmap. - None: Select this to disable all filtering for the lightmap target. |
|
| Radius | This option is only available when Filter is set to Gaussian. Use the Radius value to set the radius of the Gaussian filter kernel in texels. A higher Radius increases the blur strength and reduces the perceptible noise, but might cause detail to be lost in the lighting. | |
| Sigma | This option is only available when Filter is set to A-Trous. Use the Sigma value to adjust how much to preserve detail or blur the lighting. A higher Sigma increases the blur strength and reduces the perceptible noise, but might cause detail to be lost in the lighting. | |
统计信息
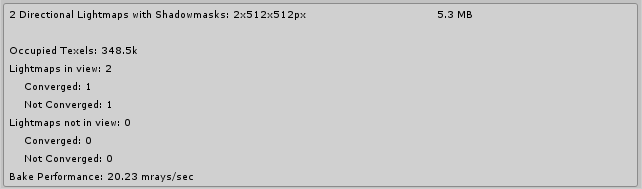
Auto Generate 和 Generate Lighting 选项下方的面板将显示有关光照贴图的统计信息,包括:
- Unity 已创建的光照贴图数量
- 内存使用量 (Memory Usage):当前光照贴图所需的内存量。
- 占用的纹理像素 (Occupied Texels):在光照贴图 UV 空间中占用的纹理像素数量。
- 视图中的光照贴图 (Lightmaps in view):Scene 视图中的光照贴图数量。
-
不在视图中的光照贴图 (Lightmaps not in view):不在视图中的光照贴图数量。
- 融合 (Converged):这些光照贴图的所有计算都已完成。
- 未融合 (Not Converged):这些光照贴图的烘焙仍在进行中。
- Bake Performance: The number of rays per second. If this is low (that is, less than 2) you should adjust your settings or your hardware to process more light rays at a time.
在 Auto 模式下,Unity 会自动计算光照贴图和光照探针。如果禁用 Auto__,则需要按 Build__ 按钮开始烘焙。
在烘焙期间
渐进光照贴图提供了在必要时监控和停止烘焙的选项。
ETA

Unity 烘焙光照贴图时出现的进度条提供了“预计到达时间”(显示为 __ETA__)。这是完成当前烘焙的估计时间(秒)。这样可以实现更加可预测的烘焙时间,并可让您快速了解当前光照设置所需的烘焙时间。
强制停止 (Force Stop)

During manual baking, click Force Stop at any time to halt the baking process. This allows you to stop the process as soon as you see results that look good.
在 2018.1 版中添加了渐进光照贴图 NewIn20181
2018–11–27 Page amended with limited editorial review